---
title: "Using SQLAlchemy with MariaDB Connector/Python: Part 2"
publish_date: 2021-05-25
updated_date: 2024-03-19
author: "Rob Hedgpeth"
channel:
- name: "Developer"
url: "/resources/blog/channel/developer.md"
tags:
- name: "MariaDB Connector"
url: "/resources/blog/tag/mariadb-connector.md"
- name: "Python"
url: "/resources/blog/tag/python.md"
- name: "SQLAlchemy"
url: "/resources/blog/tag/sqlalchemy.md"
---
# Using SQLAlchemy with MariaDB Connector/Python: Part 2
In the previous post, “[Using SQLAlchemy with MariaDB Connector/Python: Part 1](https://staging-mdb.com/resources/blog/using-sqlalchemy-with-mariadb-connector-python-part-1/)”, we walked through the steps of setting up a new Python application that uses [MariaDB Connector/Python](https://staging-mdb.com/docs/clients/connector-python/) and [SQLAlchemy](https://www.sqlalchemy.org/) to connect to and communicate with MariaDB databases.
Building from the information in Part 1, this blog post will introduce you to the SQLAlchemy entity relationships. We’ll take a look at what relationships are, what makes them so useful when developing solutions using SQLAlchemy and relational databases, and, most importantly, how to set up and use them within Python applications that use MariaDB.
Going forward I’m going to assume that you have an existing environment that allows you to set up, configure, and execute Python applications using MariaDB Connector/Python and SQLAlchemy. If you don’t, don’t fret! The foundational information that you need to know to walk-through this post can be found in “[Using SQLAlchemy with MariaDB Connector/Python: Part 1](https://staging-mdb.com/resources/blog/using-sqlalchemy-with-mariadb-connector-python-part-1/)”.
### SQLAlchemy Relationships
Before diving into the steps of setting up and using SQLAlchemy relationships it’s important to understand what they are and why they’re useful.
Most simply put, [SQLAlchemy provides an API for creating relationships](https://docs.sqlalchemy.org/en/14/orm/basic_relationships.html#one-to-many) between mapped classes. Ultimately, there are four types of relationships that are supported: one-to-one, one-to-many, many-to-one, and many-to-many. The following describes each of the relationship types and provides `Parent` and `Child` classes as very simple examples of how to configure such relationships using SQLAlchemy capabilities.
###### One-to-many
In a [one-to-many relationship](https://docs.sqlalchemy.org/en/14/orm/basic_relationships.html#one-to-many), one record in a table can be associated with one or more records in another table. In SQLAlchemy, a one-to-many relationship requires a foreign key to be specified on the `Child` class that is used to reference a `Parent` class. For example:
```
class Parent(Base):
__tablename__ = 'parent'
id = Column(Integer, primary_key=True)
children = relationship("Child")
```
**Note**: The [relationship](https://docs.sqlalchemy.org/en/14/orm/relationship_api.html#sqlalchemy.orm.relationship) method is used on the `Parent` model in order to reference a collection of items used by the `Child` model.
```
class Child(Base):
__tablename__ = 'child'
id = Column(Integer, primary_key=True)
parent_id = Column(Integer, ForeignKey('parent.id'))
```
To establish a bidirectional relationship, where the `Child` model contains a `parent` property that is mapped to a single `parent` record, you can use [*relationship.back\_populates*](https://docs.sqlalchemy.org/en/14/orm/relationship_api.html#sqlalchemy.orm.relationship.params.back_populates).
```
class Child(Base):
__tablename__ = 'child'
id = Column(Integer, primary_key=True)
parent_id = Column(Integer, ForeignKey('parent.id'))
parent = relationship("Parent", back_populates="children")
```
###### Many-to-one
[Many-to-one relationships](https://docs.sqlalchemy.org/en/14/orm/basic_relationships.html#many-to-one) can be configured by setting a foreign key in the `Parent` model referencing the `Child` model.
```
class Parent(Base):
__tablename__ = 'parent'
id = Column(Integer, primary_key=True)
child_id = Column(Integer, ForeignKey('child.id'))
child = relationship("Child")
```
```
class Child(Base):
__tablename__ = 'child'
id = Column(Integer, primary_key=True)
```
###### One-to-one
[One-to-one relationships](https://docs.sqlalchemy.org/en/14/orm/basic_relationships.html#one-to-one) can be configured by setting a bidirectional relationship, using a scalar attribute, on both sides (e.g. `Child` and `Parent`). To achieve this, the *[relationship.uselist](https://docs.sqlalchemy.org/en/14/orm/relationship_api.html#sqlalchemy.orm.relationship.params.uselist)* flag indicates the placement of a scalar attribute instead of a collection on the “many” side of the relationship.
```
class Parent(Base):
__tablename__ = 'parent'
id = Column(Integer, primary_key=True)
child = relationship("Child", uselist=False, back_populates="parent")
```
```
class Child(Base):
__tablename__ = 'child'
id = Column(Integer, primary_key=True)
parent_id = Column(Integer, ForeignKey('parent.id'))
parent = relationship("Parent", back_populates="child")
```
###### Many-to-many
Many-to-many relationships require an *association* to be created between two classes.
```
association_table = Table('association', Base.metadata,
Column('left_id', Integer, ForeignKey('left.id')),
Column('right_id', Integer, ForeignKey('right.id'))
)
```
Then the association table is targeted by using the *[relational.secondary](https://docs.sqlalchemy.org/en/14/orm/relationship_api.html#sqlalchemy.orm.relationship.params.secondary)* argument, via the `relationship` function.
```
class Parent(Base):
__tablename__ = 'left'
id = Column(Integer, primary_key=True)
children = relationship("Child", secondary=association_table, back_populates="parents")
```
```
class Child(Base):
__tablename__ = 'right'
id = Column(Integer, primary_key=True)
parents = relationship("Parent", secondary=association_table, back_populates="children")
```
**Note**: Bidirectional relationships can be established by using the `back_populates` attribute in combination with a common association table.
### SQLAlchemy in Action
Now let’s take a look at a more practical example. The following is going to walk you through the process of setting up a sample Python application that uses SQLAlchemy to manage and use the relationship capabilities within SQLAlchemy. If you want to jump directly into the sample code you can find it [here](https://github.com/mariadb-corporation/dev-example-blog-samples/tree/main/mariadb_python_sqlalchemy/part_2).
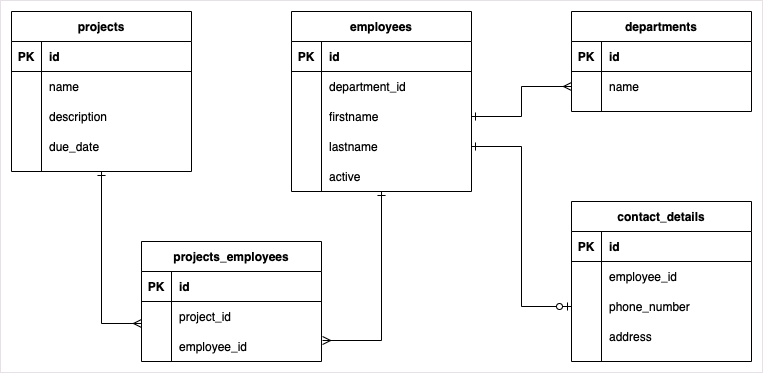
The sample we’ll be walking through uses a simple collection of tables that contain all of the previously mentioned relationship types (one-to-one, one-to-many, many-to-one, many-to-many).
##### Preparing a Python application
Just like in the [Part 1 blog post](https://staging-mdb.com/resources/blog/using-sqlalchemy-with-mariadb-connector-python-part-1/), you will create a new [virtual environment](https://docs.python.org/3/library/venv.html#venv-def), which is simply a directory tree that contains Python executable files and other files which indicate that it is a self-contained environment. This will be the case whether you are building this application from scratch or if you have pulled down the [pre-existing source from GitHub](https://github.com/mariadb-corporation/dev-example-blog-samples/tree/main/mariadb_python_sqlalchemy/part_2).
Using a new terminal window, navigate to the root directory and execute the following command.
```
$ python3 -m venv venv
```
Next, activate the new virtual environment.
```
$ . venv/bin/activate
```
Finally, install the Maria Connector/Python and SQLAlchemy packages from the [Python Package Index (PyPi)](https://pypi.org/).
```
$ pip install mariadb sqlalchemy
```
###### Configuring the models
Now that a Python virtual environment has been set up, and the necessary packages have been installed, you’re ready to start creating a new application. Ramping up the complexity a bit from the first blog post, you’re going to be creating several Python files.
**base.py**
Similarly to [Part 1](https://staging-mdb.com/resources/blog/using-sqlalchemy-with-mariadb-connector-python-part-1/), you’re going to need to create a SQLAlchemy engine instance that can be used to create a new `Session` object, which is used to connect to and communicate with an underlying database. To do this create a new file called **base.py** then copy and paste the following code into it.
```
from sqlalchemy import create_engine
from sqlalchemy.ext.declarative import declarative_base
from sqlalchemy.orm import sessionmaker
```
```
engine = create_engine("mariadb+mariadbconnector://app_user:Password123!@127.0.0.1:3306/planning")
Session = sessionmaker(bind=engine)
```
```
Base = declarative_base()
```
**Note**: The connection string indicated in the previous code snippet assumes you have a local MariaDB database instance with a user called “`app_user`” with the password “`Password123`!” and an existing database named *planning*.
From here, you’ll be adding a new file for each model. However, unlike the models that you used in [Part](https://staging-mdb.com/resources/blog/using-sqlalchemy-with-mariadb-connector-python-part-1/) 1, the following models will contain additional functionality to define the appropriate mappings between them.
**project.py**
The `Project` model functions as a mapping to the `products` table. The `Project` model contains information about the fields contained within the `products` table as well as a property called `employees`, which defines the many-to-many relationship between it and the Employee model.
The many-to-many relationship between `Product` and `Employee` is made possible through an association object called `projects_employees_associations`, which is defined through use of the `Table` mapping of the `projects_employees` table.
Create a new file called `project.py` then copy and paste the following code into it.
```
from sqlalchemy import Column, String, Integer, Date, Table, ForeignKey
from sqlalchemy.orm import relationship
```
```
from base import Base
```
```
projects_employees_association = Table(
'projects_employees', Base.metadata,
Column('project_id', Integer, ForeignKey('projects.id')),
Column('employee_id', Integer, ForeignKey('employees.id'))
)
```
```
class Project(Base):
__tablename__ = 'projects'
```
```
id = Column(Integer, primary_key=True)
name = Column(String(length=100))
description = Column(String(length=500))
due_date = Column(Date)
employees = relationship("Employee", secondary=projects_employees_association)
```
```
def __init__(self, name, description, due_date):
self.name = name
self.description = description
self.due_date = due_date
```
**employee.py**
The `Employee` model functions as a mapping to the `employees` table. The `Employee` model contains configuration that establishes a many-to-one relationship, via `department`, and a one-to-one relationship, through the `contact_details` property.
```
from sqlalchemy import Column, String, Integer, Boolean, ForeignKey
from sqlalchemy.orm import relationship, backref
```
```
from base import Base
```
```
class Employee(Base):
__tablename__ = 'employees'
```
```
id = Column(Integer, primary_key=True)
department_id = Column(Integer, ForeignKey('departments.id'))
firstname = Column(String(length=100))
lastname = Column(String(length=100))
active = Column(Boolean, default=True)
department = relationship("Department", back_populates="employees")
contact_details = relationship("ContactDetails", uselist=False, back_populates="employee")
```
```
def __init__(self, firstname, lastname, department):
self.firstname = firstname
self.lastname = lastname
self.department = department
```
**department.py**
The `Department` model functions as a mapping to the `departments` table. The `Department` model contains configuration for a one-to-many relationship via the `employees` property.
```
from sqlalchemy import Column, String, Integer, ForeignKey
from sqlalchemy.orm import relationship
```
```
from base import Base
```
```
class Department(Base):
__tablename__ = 'departments'
```
```
id = Column(Integer, primary_key=True)
name = Column(String(length=50))
employees = relationship("Employee")
```
```
def __init__(self, name):
self.name = name
```
**contact\_details.py**
The `ContactDetails` model functions as a mapping to the `contact_details` table. Using the `employee_id` field, the `ContactDetails` model contains a one-to-one relationship with the `Employee` model.
```
from sqlalchemy import Column, String, Integer, ForeignKey
from sqlalchemy.orm import relationship, backref
```
```
from base import Base
```
```
class ContactDetails(Base):
__tablename__ = 'contact_details'
```
```
id = Column(Integer, primary_key=True)
phone_number = Column(String(length=12))
address = Column(String(length=100))
employee_id = Column(Integer, ForeignKey('employees.id'))
employee = relationship("Employee", backref=backref("contact_details", uselist=False))
```
```
def __init__(self, phone_number, address, employee):
self.phone_number = phone_number
self.address = address
self.employee = employee
```
###### Loading data
As you learned in the previous blog post, object-relational mapping (ORM) libraries often give you the ability to create and modify database schemas through the use of code.
The following code, which can be added to a new file called load.py, will import all of the previously defined models then use them to create the database tables and finally load data into them.
```
from datetime import date
```
```
from base import Session, engine, Base
from employee import Employee
from project import Project
from department import Department
from contact_details import ContactDetails
```
```
# Generate database schema
Base.metadata.create_all(engine)
```
```
# Create a new session
session = Session()
```
```
# Create projects
project_1 = Project("Project 1", "Project 1 description", date(2021, 5, 31))
project_2 = Project("Project 2", "Project 2 description", date(2021, 4, 30))
project_3 = Project("Project 3", "Project 3 description", date(2021, 6, 15))
```
```
# Create departments
dept_marketing = Department("Marketing")
dept_engineering = Department("Engineering")
```
```
# Create employees
emp_john = Employee("John", "Locke", dept_marketing)
emp_kate = Employee("Kate", "Austin", dept_engineering)
emp_jack = Employee("Jack", "Shepherd", dept_marketing)
emp_ben = Employee("Ben", "Linus", dept_marketing)
emp_sun = Employee("Sun", "Kwan", dept_engineering)
```
```
# Add employees to projects
project_1.employees = [emp_john,emp_kate]
project_2.employees = [emp_jack,emp_ben,emp_sun]
project_3.employees = [emp_john,emp_kate,emp_jack,emp_ben,emp_sun]
```
```
# Create contact details
cd_john = ContactDetails("417 315 2531", "123 S Main ST", emp_john)
cd_kate = ContactDetails("212 315 2533", "124 S Main ST", emp_kate)
cd_jack = ContactDetails("816 315 2534", "125 S Main ST", emp_jack)
cd_ben = ContactDetails("913 315 2535", "126 S Main ST", emp_ben)
cd_sun = ContactDetails("773 315 2536", "127 S Main ST", emp_sun)
```
```
# Persist data
session.add(project_1)
session.add(project_2)
session.add(project_3)
```
```
session.add(dept_marketing)
session.add(dept_engineering)
```
```
session.add(cd_john)
session.add(cd_kate)
session.add(cd_jack)
session.add(cd_ben)
session.add(cd_sun)
```
```
session.commit()
session.close()
```
Once you’ve added the previous code block into a new `load.py` file you can execute it using the following command:
```
$ python load.py
```
###### Querying data
After configuring the relationships and loading information into MariaDB, all directly through Python code, it’s time to take a look at how you can use the classes.
The following code provides a small sample of what’s possible with the models that you’ve created. Using the basic querying knowledge that you learned about in the first blog post, you can dive deeper to examine the relationship data that has been automatically added. To do this simply create a new file called **`query.py`** then copy and paste the following code into it.
```
from base import Session
from project import Project
from employee import Employee
from department import Department
from contact_details import ContactDetails
```
```
session = Session()
```
```
# Get all employees
```
```
employees = session.query(Employee).all()
```
```
print('### Employees ###')
for employee in employees:
print(f' - {employee.firstname} {employee.lastname}, phone: {employee.contact_details.phone_number}')
```
```
# Get all projects
projects = session.query(Project).all()
```
```
print('### Projects ###')
for project in projects:
print(project.name)
for employee in project.employees:
print(f' - {employee.firstname} {employee.lastname} ({employee.department.name})')
```
```
# Get all departments
departments = session.query(Department).all()
```
```
print('### Departments ###')
for department in departments:
print(department.name)
for employee in department.employees:
print(f' - {employee.firstname} {employee.lastname}')
```
```
# John Lock projects
john_lock_projects = session.query(Project) \
.join(Employee, Project.employees) \
.filter(Employee.firstname == 'John') \
.all()
```
```
print('### John Locke projects ###')
```
```
for project in john_lock_projects:
print(f'- {project.name}')
```
Once you’ve added the previous code block into a new `query.py` file you can execute it using the following command:
```
$ python query.py
```
### Next Steps
In this tutorial you learned how to set up relationships between Python classes, and more specifically SQLAlchemy models. Hopefully this walkthrough has given you the foundation you need to start creating your own solutions.
In fact, now that you’ve gotten your feet wet with both SQLAlchemy and MariaDB Connector/Python we’re anxious to see what you’ll do with it! Please reach out to us at to let us know what you’re creating, with any questions or feedback you have, or with ideas of more content you’d like to see us provide.
### Additional Resources
You can find the first part of this blog series at .
Wanting to dive deeper? Take a look at the official MariaDB Connector/Python documentation available at .
For more development content like this be sure to check out the [MariaDB Developer Hub](https://staging-mdb.com/developers/).