A Typical Journey Migrating to MariaDB from Oracle

MariaDB takes a unique approach to providing database solutions for modern business needs. With MariaDB Enterprise, organizations can depend on a single complete database for all their needs, whether on commodity hardware or their cloud of choice. For example, our pluggable, purpose-built storage engines support work that previously required a variety of specialized databases. Deployed in minutes for transactional, analytical or hybrid use cases at any scale, MariaDB delivers unmatched operational agility without sacrificing key enterprise features such as real ACID compliance and full SQL.
In the same way, MariaDB offers compatibility features permitting easy migration from Oracle, SQL Server, Postgres and so many others to MariaDB in a few steps without an application rewrite.
This blog walks you through the major steps required to migrate easily from Oracle to MariaDB. I’ll demonstrate how the capabilities offered by MariaDB MaxScale, our smart database proxy, and the compatibility mode of MariaDB Enterprise Server greatly simplify migration.
Compatibility mode is available for on-premises deployments.
Prerequisites
The migration process detailed here relies on MariaDB Enterprise Server and MariaDB MaxScale. MaxScale configuration will be created with the help of the MaxScale GUI.
Because installations vary, I haven’t included full instructions here for installing MariaDB Enterprise Server and MariaDB MaxScale. See the MariaDB Enterprise documentation for complete installation instructions:
- Install MariaDB Enterprise Server and Enterprise Backup
- Install MariaDB MaxScale
- Getting started with the MariaDB MaxScale GUI
- SQL_MODE — MariaDB Enterprise documentation
Before digging into the data and structure, MariaDB recommends running a migration assessment in the “Migration Portal” within the MariaDB customer portal. The Migration Portal has a variety of resources to assist you in migrating to MariaDB. In the “New Migration” section, you can choose the database that you’d like to migrate from and get a customized migration assessment to help you evaluate and plan for your migration project.
Verify the current SQL MODE
Because variables vary and can be adjusted by external software, it’s worth double checking that SQL_MODE is running.
Verify the current SQL mode from a Linux terminal:
sudo mariadb -e "show global variables like 'sql_mode';"
In our example, it is showing the default configuration of the SQL_MODE variable:
 +---------------+-------------------------------------------------------------------------------------------+
 | Variable_name | Value                                                                                     |
 +---------------+-------------------------------------------------------------------------------------------+
 | sql_mode      | STRICT_TRANS_TABLES,ERROR_FOR_DIVISION_BY_ZERO,NO_AUTO_CREATE_USER,NO_ENGINE_SUBSTITUTION |
 +---------------+-------------------------------------------------------------------------------------------+
Try to create a table with Oracle syntax
Let’s try to create a simple table with Oracle syntax while using the default SQL_MODE:
MariaDB [oracle_migration]> CREATE TABLE "customers" (
"CUST_ID" NUMBER(8,0),
"FIRST_NAME" VARCHAR2(50 BYTE),
"LAST_NAME" VARCHAR2(50 BYTE),
"ADDRESS1" VARCHAR2(128 BYTE)
);
ERROR 1064 (42000): You have an error in your SQL syntax; check the manual that corresponds to your MariaDB server
version for the right syntax to use near '"customers" ("CUST_ID" NUMBER(8,0), "FIRST_NAME" VARCHAR2(50 BYTE), "LAST_NAM...' at line 1
This syntax can’t be recognized by default on the MariaDB client. Many items prevent this creation, for example, the double quotes.
Enable Oracle compatibility mode
Change session SQL_MODE to Oracle compatibility mode:
SET SESSION sql_mode='ORACLE';
Query OK, 0 rows affected (0.035 sec)
Try and create the same table again:
MariaDB [oracle_migration]> CREATE TABLE "customers" (
"CUST_ID" NUMBER(8,0),
"FIRST_NAME" VARCHAR2(50 BYTE),
"LAST_NAME" VARCHAR2(50 BYTE),
"ADDRESS1" VARCHAR2(128 BYTE)
);
 ERROR 1064 (42000): You have an error in your SQL syntax; check the manual that corresponds to your MariaDB server
version for the right syntax to use near 'BYTE), "LAST_NAME" VARCHAR2(50 BYTE), "ADDRESS1" VARCHAR2(128 BYTE))' at line 1
It again returns an error, but it is a different error. The BYTE value is not recognized on the MariaDB client with Oracle compatibility mode.
So what can be done about removing the BYTE keyword?
We can rely on MariaDB MaxScale capabilities to remove and update the syntax on live queries.
MaxScale 2.5 includes a smart GUI that enables easily monitoring and configuring MaxScale on live traffic. The next step will be about how to use the MariaDB MaxScale GUI.
Access the MaxScale GUI
On MaxScale, we can define a rule to rewrite the live query before it goes to a MariaDB Server. This capability is particularly useful when some live queries need to be adjusted without any impact on the application.
These capabilities can also be useful to fix typos in the application without any deployment or any impact on the production.

Once configured, the MaxScale GUI is available on port 8989 by default. Let’s access this interface with the following address https://127.0.0.1:8989.
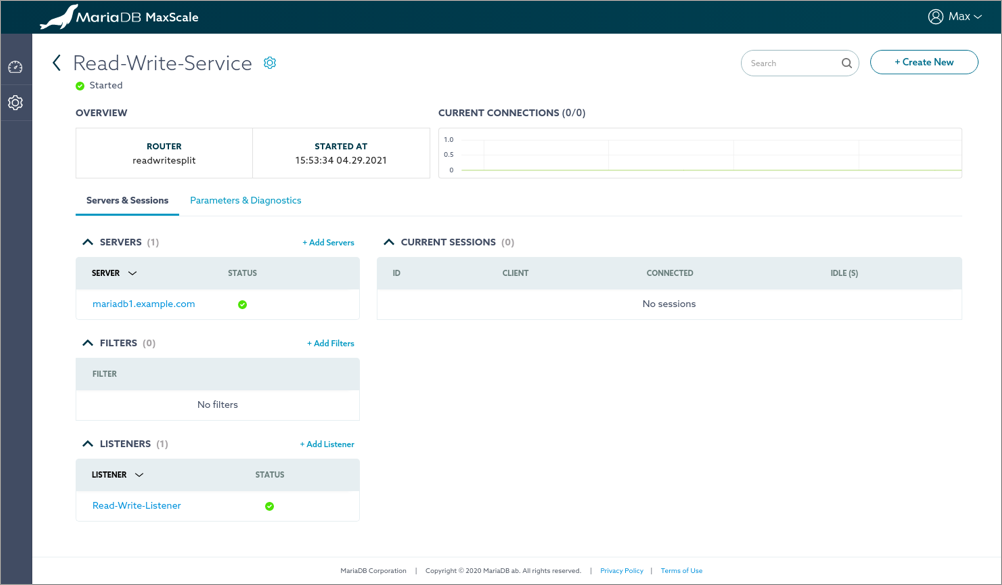
Once connected, access the MaxScale GUI monitoring page and access the considered service.

MaxScale configuration is made of several modules. All these modules are linked in what we call “Services”. We can see on the previous screenshot that a service is linking several servers, a monitoring system, a listening port, a routing rule, and potentially many filters.
In this case, only one service is defined – the “Read-Write Service”. Let’s access this service definition by clicking on its name:

Define a new Regex filter
Using a Regex filter on MariaDB MaxScale allows you to rewrite live queries.
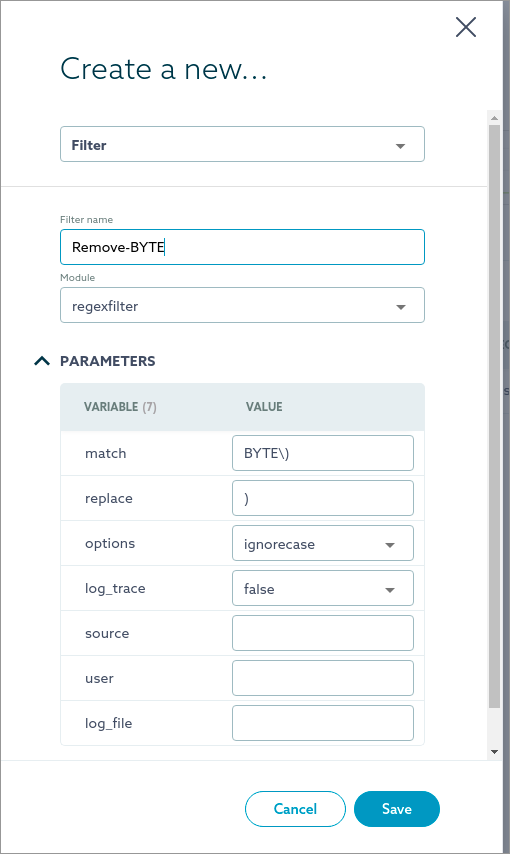
First, go back to the MaxScale overview screen and click on + Create New and define the configuration of a new filter:

Choose to create a new filter.
Provide a name matching the filter objective, and choose “regexfilter”.
In the parameter insert into the match parameter the originated value to replace: BYTE\)
To match a special character like parenthesis, remember to escape it by adding a backslash as shown.
Complete the replace box with the desired value. In this case it is parenthesis without escaping the special character.
Once completed validate this new rule.
Associate the new rule to the desired service
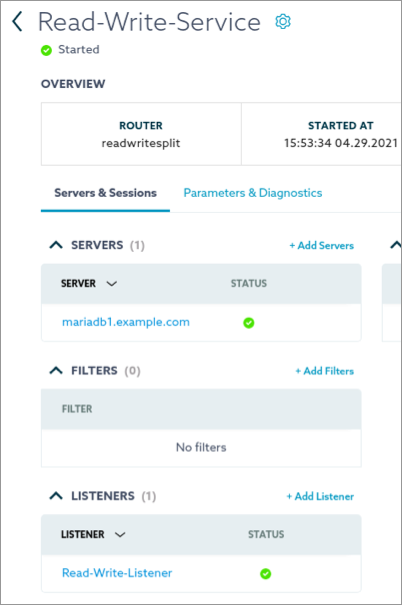
Now that the new filter has been created, go back to the service definition page and click on + Add Filters button on the Filters section.

On the Add filters box, enable the newly created filter in order to have it associated with the current service and listener.
Once done, we can test our CREATE TABLE command again.
Checking the newly created rule
Use the mariadb command line and access the MaxScale service.
$ mariadb -hmaxscale1.example.com -P4006 -utest -p
Enter password:
Welcome to the MariaDB monitor.  Commands end with ; or \g.
Your MariaDB connection id is 2
Server version: 10.5.9-6-MariaDB-enterprise MariaDB Enterprise Server
Copyright (c) 2000, 2018, Oracle, MariaDB Corporation Ab and others.
Type 'help;' or '\h' for help. Type '\c' to clear the current input statement.
MariaDB [(none)]>
Once well connected through the MaxScale interface, we can now test the newly created rewrite rule.
Let’s use the previously created database:
MariaDB [(none)]> use oracle_migration
Reading table information for completion of table and column names
You can turn off this feature to get a quicker startup with -A
Database changed
Enable on the considered session the Oracle mode:
MariaDB [(none)]> SET SESSION sql_mode='ORACLE';
Query OK, 0 rows affected (0.004 sec)
Try again to create this table with exactly the same syntax:
MariaDB [oracle_migration]> CREATE TABLE "customers" (
"CUST_ID" NUMBER(8,0),
"FIRST_NAME" VARCHAR2(50 BYTE),
"LAST_NAME" VARCHAR2(50 BYTE),
"ADDRESS1" VARCHAR2(128 BYTE)
);

Query OK, 0 rows affected (0.044 sec)
It’s done, the application wasn’t modified at all, the table was created without errors.
Of course it’s possible to define many other rules.
For more information
Here are some links to other information you may find helpful.
- Migrate to MariaDB Enterprise from Oracle: Lower TCO without Lowering Standards
- High Availability with Automatic Failover video introduction to MaxScale capabilities
- Demo: Getting the Most Out of MariaDB with MaxScale on-demand webinar with live demonstrations of MaxScale GUI
- New features in MariaDB MaxScale 2.5
- OS specific installation and upgrade instructions for MariaDB MaxScale 2.5
- Deploying MariaDB MaxScale for Cluster, Replication, ColumnStore or HTAP
- Configuring MaxScale for MaxGUI
- Replaying Transactions with MaxScale’s Read/Write Split Router


