
If you are a Software Developer, DevOps Engineer, DBA, or Systems Administrator, you need a Raspberry Pi or an equivalent single-board mini-computer. Modern distributed cloud applications run on infrastructure that requires work on networking, security, provisioning, and monitoring. These are valuable skills that you can exercise by using affordable devices that emulate the real world more closely than virtual machines or Docker containers do. Here’s how Alex Ellis sums it up:
«Let me put this succinctly – the Raspberry Pi is a Linux server. If you write code, or “do DevOps” for a day-job, you have a use-case. If you use a computer on a daily basis, you have a use-case.»
Having a Raspberry Pi is almost like having an Amazon t2.nano EC2 instance. Just for fun here’s a comparison:
| Amazon t2.nano EC2 instance | Raspberry Pi Zero 2 W | |
|---|---|---|
| Memory | 536 MB | 512 MB |
| CPUs | 1 vCPU | 4 cores |
| Clock speed | 3 GHz | 1 GHz |
| CPU Architecture | x86 | ARM |
This article covers a specific use case—configuring a portable database server that you can connect via WiFi or through USB Ethernet emulation. It covers the steps to set up a SQL database on a Raspberry Pi Zero W 2—one of the smallest single-board computers available—but you can adapt the instructions to other models and brands like Raspberry Pi 4, Banana Pi BPI-M2 Zero, or Radxa Zero.
During my experiments, I found that SQLite, TinyDB, and MariaDB are the best databases for Raspberry Pi devices and, in general, for IoT applications. They are compatible with Raspberry Pi hardware and don’t consume a lot of resources. They also support a variety of programming languages and tools. In this article, you’ll learn how to install the popular open-source MariaDB database server and how to connect to it remotely from your computer using DBeaver.
Here is a list of items needed to turn your Raspberry Pi into a database server:
- Wi-Fi network
- MicroSD card
- Raspberry Pi
- USB Cable
- Power supply
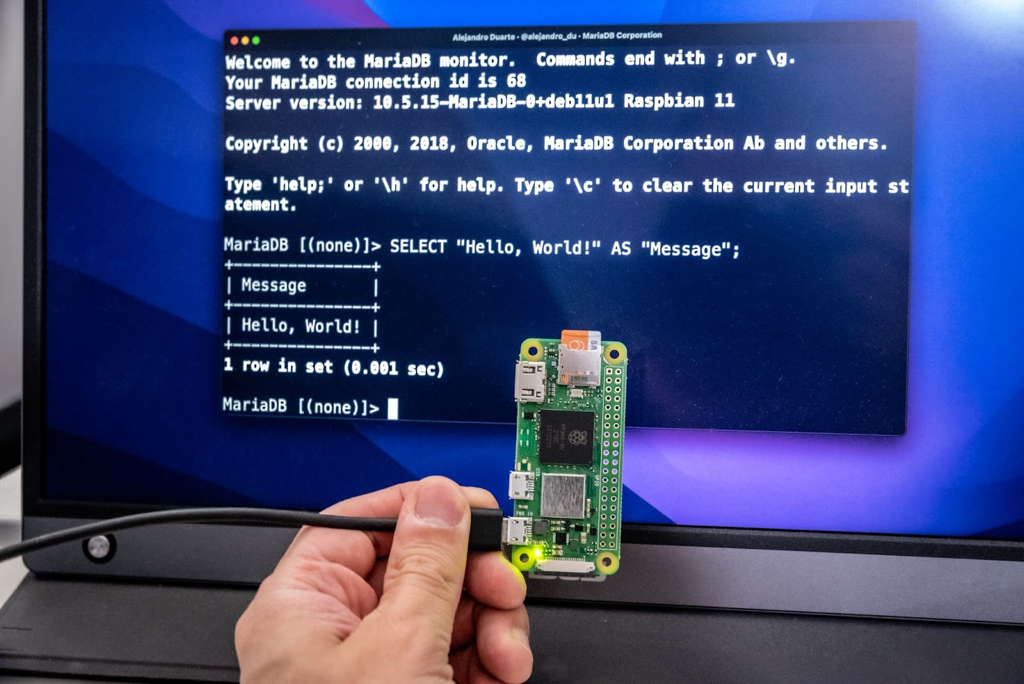
MariaDB running on a Raspberry Pi Zero 2 W
Setting up Raspberry Pi
You have to install an operating system on the microSD card. Try to get a fast card as this will make a huge impact on the performance of the database in particular and the device in general.
1. On your working laptop or computer (as opposed to the Raspberry Pi), install the Raspberry Pi Imager software and install Raspberry Pi OS Lite (64-bit):
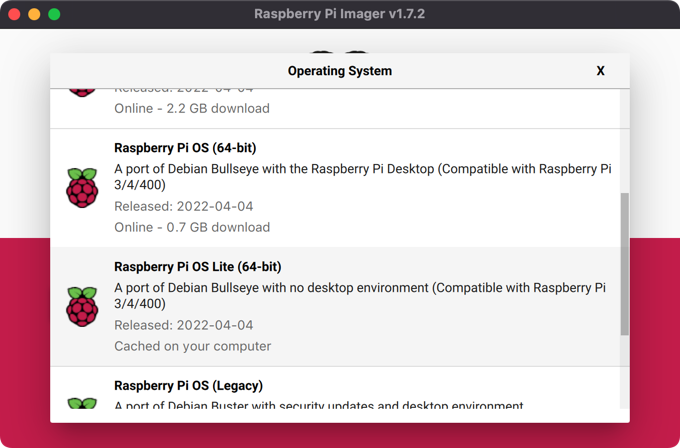
Operating system selection
2. Choose your storage device. Make sure to select the correct one (the microSD card).
3. Click on the gear icon on the bottom right corner and configure the following:
![]()
- Hostname: You will use this to connect to the Pi through SSH. I used
zero01but feel free to use any username you like. - Enable SSH: Make sure to check this. If you do not want to deal with SSH keys, select Use password authentication (this is what I did).
- Set username and password: Specify a Linux username and password. You may use any combination. In this article, I used
user/passwordbut you should use something more secure. - Configure wireless LAN: Check this option and configure the connection to your WiFi network. Keep in mind that you’ll have to use a 2.4G network.
4. Save the settings and click on WRITE. This will write a bootable Raspberry Pi OS on the card.

Write option starts the installation process
The software asks if you are willing to continue and erase all the existing data on the device. Make sure you have backed up your files and then click on, YES.
When the process finishes, plug the microSD card into the Pi, grab a micro USB cable, and connect it to a power supply. I used an iPhone charger. Use the right-most micro USB port on the Pi. The mini-computer should boot now. Be patient. The first boot can take some time. Even minutes. But subsequent boots will be faster.
5. On your working computer open a terminal window and connect to the Pi via SSH. Use the username, hostname, and password that you configured during the installation process. Make sure your working computer is connected to the same LAN you configured for Raspberry Pi:
You’ll be asked to add the Pi’s key to the list of known hosts. Answer “yes” and introduce the password that you configured. You are in!
6. Before anything else, update your system:
sudo apt update
sudo apt upgrade -y
TIP: If you don’t want to type sudo all the time, use sudo su before running the commands. Just remember to type exit after you are done. Be careful as you’ll gain sudo privileges.
Installing Docker
Time to install some useful software. A database. A MariaDB database. MariaDB is an open-source relational database that uses pluggable, purpose-built storage engines to support workloads that previously required a variety of specialized databases. You can combine these storage engines in the same server and run cross-engine SQL queries (queries that join tables on different storage engines).
You can install MariaDB directly on top of your operating system, but I recommend using Docker. The run-time performance cost of running Docker containers is negligible. Take a look at this IBM research paper that compares the performance of bare metal, KVM, and Docker containers. The conclusion:
«In general, Docker equals or exceeds KVM performance in every case we tested. Our results show that both KVM and Docker introduce negligible overhead for CPU and memory performance (except in extreme cases).»
Installing Docker is pretty simple, run the following commands on your Raspberry Pi:
sudo apt install docker.io -y
Check that Docker is running correctly:
sudo service docker status
You should see active (running) reported by the service:
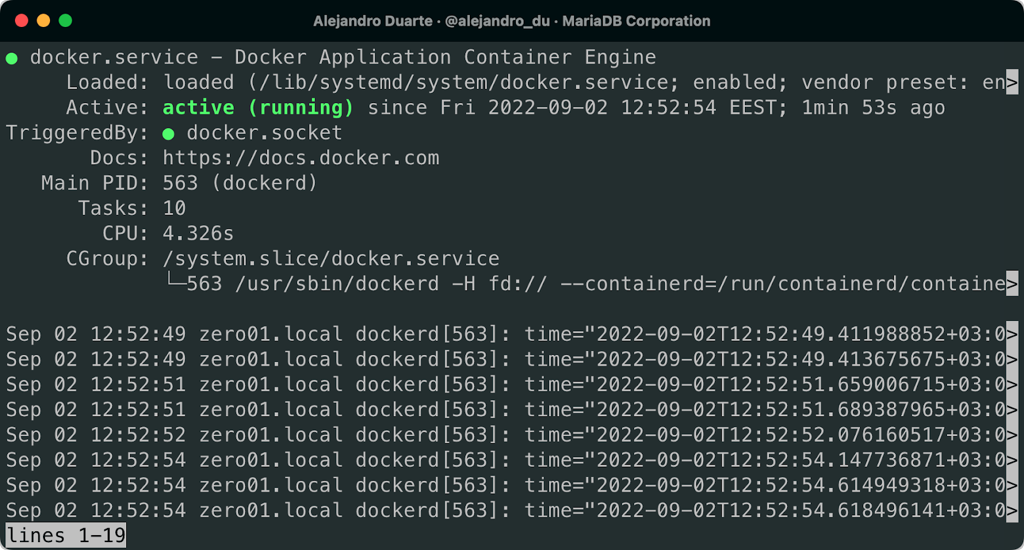
Docker service up and running
Press Q to quit the status reporting program.
If the service reports failed—which actually happened to me during my experiments—try rebooting the Pi:
sudo reboot
Running a MariaDB database server on Docker
To spin up a MariaDB instance run the following command (go ahead and try it, you can cleanly remove it later if you want):
sudo docker run --detach --net=host --name mariadb --restart unless-stopped --env MARIADB_ROOT_PASSWORD='password' mariadb:latest
We are passing several flags:
--detachruns the container in the background--net=hostmakes the container use the host’s network (the container won’t get its own IP address which removes the need to explicitly map and expose ports)--namegives the container a name that you can use later to operate the container--restart unless-stoppedmakes Docker start the container when the Pi starts--envis used to configure variables such as the root user password and other thingsmariadb:latestrefers to the official MariaDB Docker image
TIP: If you installed a 32-bit OS you can use the MariaDB Docker image provided by the linuxServer.io team. This image includes support for linux/arm/v7 architectures. Just replace mariadb:latest with linuxserver/mariadb:latest.
Check that the container is up and running:
sudo docker container ls

MariaDB server running on a Docker container
Connect to the database from within the container (we’ll see how to connect from outside later):
sudo docker exec -it mariadb bash
mariadb -u root -p
This runs a new bash session inside the container from which you can execute Linux commands that run on the container. Once inside the container, we use the CLI mariadb client to connect to the database. For fun, try the following commands that show interesting facts and configurations about your new MariaDB database:
SHOW CONTRIBUTORS;
SHOW PLUGINS;
SHOW ENGINES;
Also try a “Hello, World” SQL query:
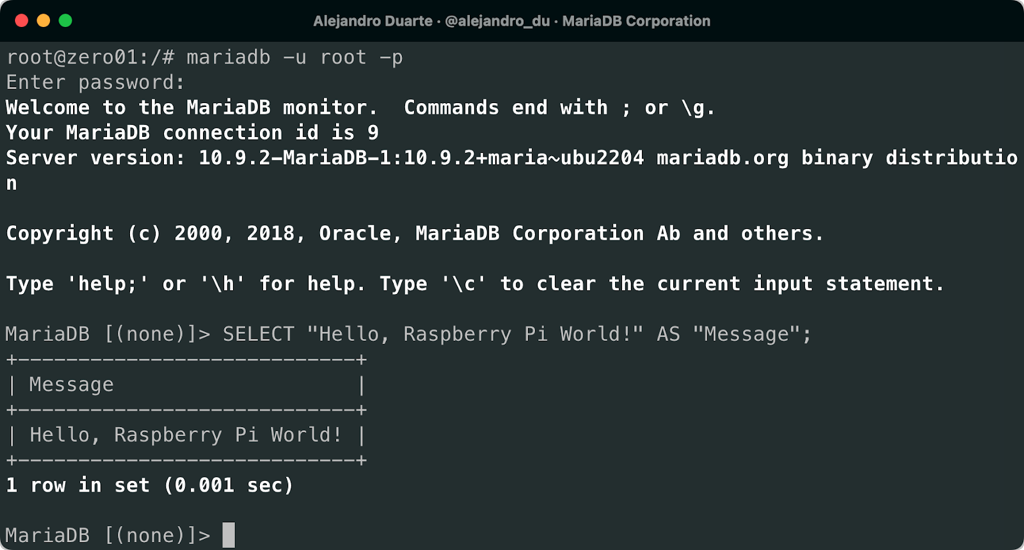
Locally running SQL queries
Once you are done, quit the SQL client and exit the container:
quit
exit
That was fun, but let’s try a different configuration. Stop and remove the mariadb container and its associated volume:
sudo docker stop mariadb
sudo docker container rm --volumes mariadb
Run a new container as follows:
sudo docker run --detach --net=host --name mariadb --restart unless-stopped --env MARIADB_ROOT_PASSWORD='password' --env MARIADB_ROOT_HOST='localhost' --env MARIADB_DATABASE='nation' --env MARIADB_USER='user' --env MARIADB_PASSWORD='password' mariadb:latest
This creates and runs a Docker container with a MariaDB database that:
- has a root user that can connect only from
localhost - has a database with the name
nation(we’ll populate this database later) - has a user with access to the
nationdatabase
This is a more secure database, except for the fact that it uses password as the password for both the root and user users (don’t do this in production!).
Connecting to the database from a laptop using DBeaver
Let’s connect to this database from your working laptop or computer using DBeaver.
1. Install the software on your computer if you haven’t already and create a new connection to the containerized MariaDB database by selecting Database > New Database Connection in the menu. Select the MariaDB database option and fill in the connection details:
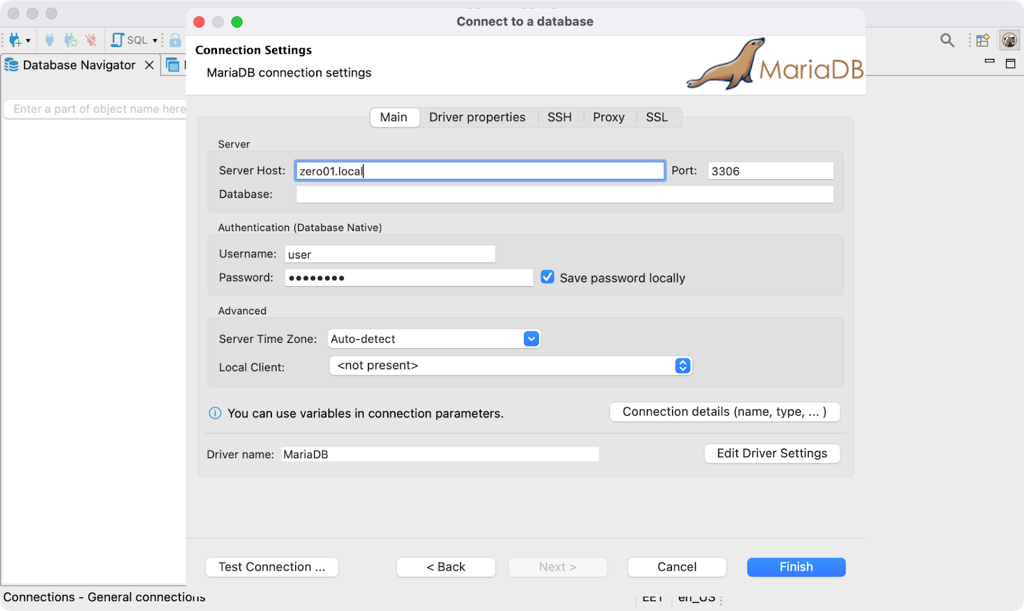
Database connection configuration
2. Test the connection and then click on the Finish button. You are now connected to a portable database from your laptop!
3. Try importing the database from the https://www.mariadbtutorial.com website. Here’s a direct link to ZIP file that contains the script. Extract this file and open the SQL file in DBeaver. Select a data source by clicking on the little database icon in the toolbar and select the connection you just created:
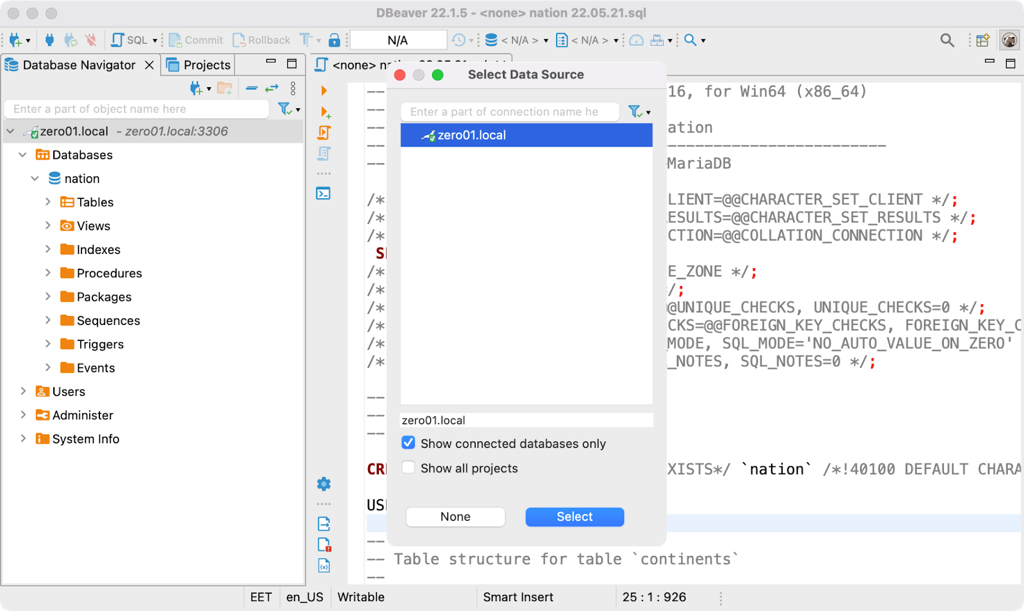
Selecting a database connection for SQL query execution
4. Select SQL Editor > Execute SQL Script in the menu. Once the script is completed, select SQL Editor > New SQL Script and run the following query (adapt it to show the languages in your country or any country you are interested in):
SELECT l.language
FROM countries c
JOIN country_languages cl ON cl.country_id = c.country_id
JOIN languages l ON l.language_id = cl.language_id
WHERE c.name = "Colombia";
Run the query. I’ll let you figure out this by yourself (hint: use the vertical toolbar). Here’s an example result:
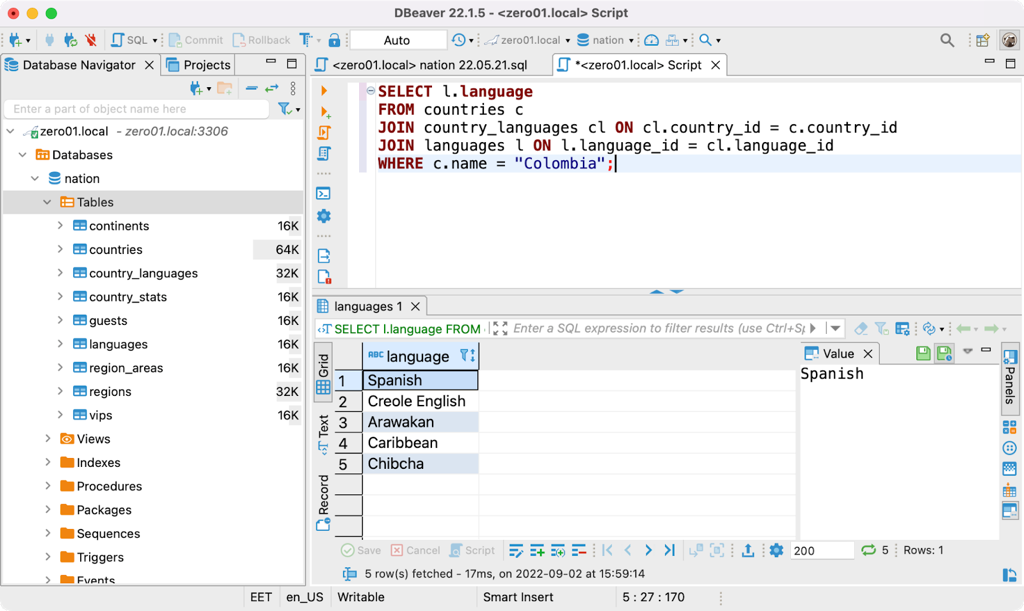
SQL query results
Here are some questions that you can answer using SQL queries on this database:
- What’s the country with the most number of languages?
- How many countries does each continent have?
- What’s the World population?
Enabling USB Gadget Ethernet
USB Gadget Ethernet allows you to connect your Raspberry Pi via USB to your computer and make it look as if it was connected to the network. This is useful when you want to connect to a different network and don’t want to hassle configuring the new network on the Pi.
If you haven’t, SSH into the Pi:
Edit the following file:
sudo nano /boot/config.txt
At the very end of the file, add the following line:
dtoverlay=dwc2
Save the file and exit the editor. Now edit the following file:
sudo nano /boot/cmdline.txt
After rootwait add the modules to load as shown here:
... rootwait modules-load=dwc2,g_ether
Save the file and exit the editor. Now power off the Pi:
sudo poweroff
Wait until the green LED turns off and disconnect the Pi from the power supply. Connect the micro USB end of the cable to the second right-most port on the Pi and the other end to your computer. Wait until the Pi boots and connect to it via SSH.
Congrats! Now you have a truly portable MariaDB database server that you can carry around and use everywhere. Consider getting a nice case for the Pi. I can recommend this one by Flirc:
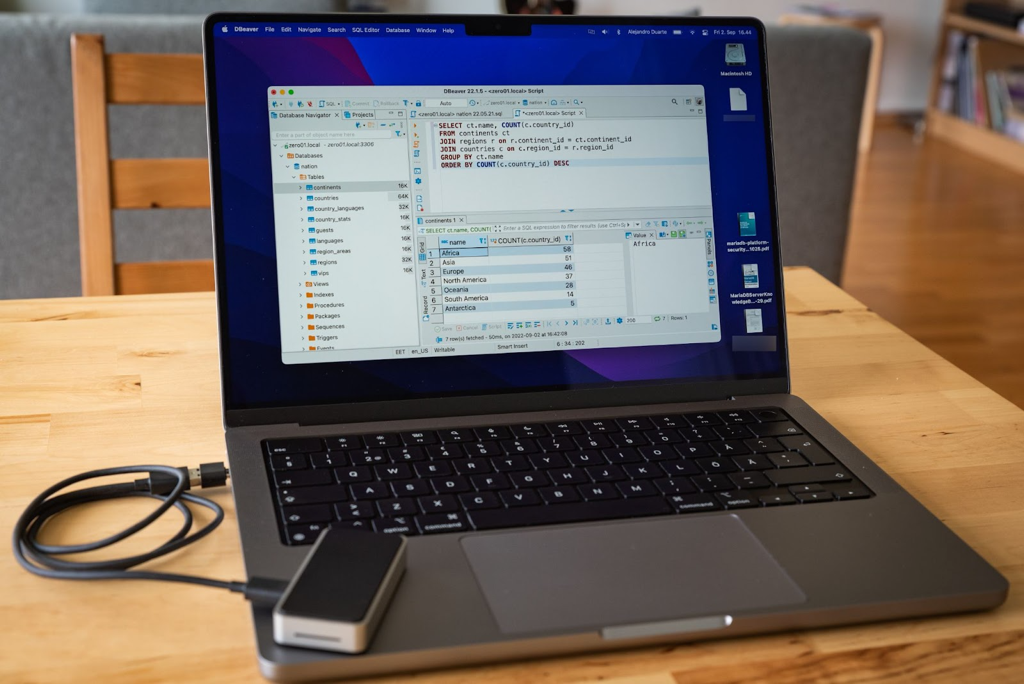
A portable MariaDB database server running on Raspberry Pi
What’s next?
Do you have another Pi laying around somewhere? They are scarce nowadays, give them some use! For example, try setting up basic replication or building something like this 32-core Raspberry Pi 4 cluster. Then try consuming the database from Java, JavaScript/Node.js, Python, and C++ applications using the official MariaDB connectors.